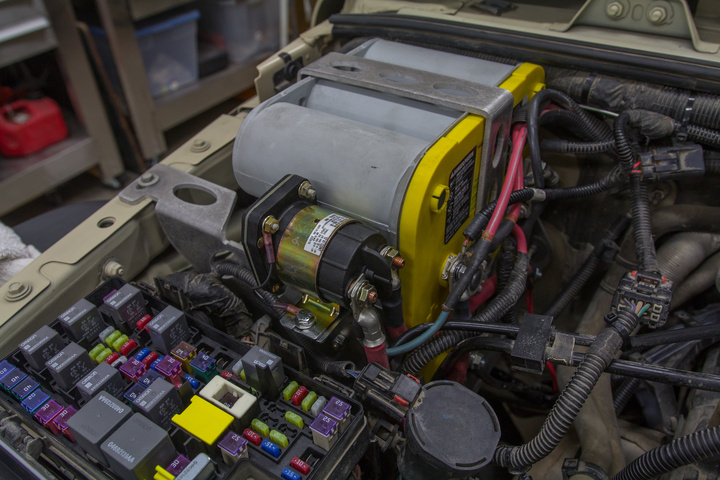
Isolated dual batteries are a must in any Overland vehicle. The setup looks complicated and difficult in photos, though it’s actually very simple. Having two batteries means one can be used only to start the vehicle (let’s call this battery the “Engine Battery”) and the other can be used for all your electrical needs like a fridge, camp lights, charging of devices, running an inverted etc. (Let’s call this battery the “House Battery”). The isolation part refers to how the batteries are connected and disconnected with the engine is running and when the engine is not.
When the engine is running, we want the batteries to be connected in parallel (positive to positive, negative to negative) so we still get 12V, and the alternator can charge both batteries.
When the engine is not running, we want to separate the batteries, so that if the House Battery is completely discharged, the Engine Battery remains unaffected and will still start the vehicle engine without issue.
This “isolator” is commonly a large amperage solenoid that is triggered with an ignition hot wire.
Things To Consider
- Because the two batteries will be connected in parallel when the engine is running, it’s highly recommended to use two identical batteries to ensure even charging from the alternator.
- A cheap solenoid might save $30 now, though given it’s the fundamental piece of the puzzle, I recommend buying a good one that will last a very long time
- The system described here does nothing to prevent excessive discharging of the House Battery – if you leave multiple big camp lights on overnight, your house battery will completely discharge, which is usually not good for the longevity of the battery. Make sure you turn your electronics off, and/or buy devices with a voltage cutoff (i.e. my has a setting that will turn the fridge off when it senses the House Battery is too low)
Things To Buy
- Two Batteries. I use and recommend . They are specifically designed to handle the kind of charging and discharging the House Battery is going to go through. As a bonus they can be mounted on the side which is a win in the cramped JK engine bay and opens up all kinds of mounting options
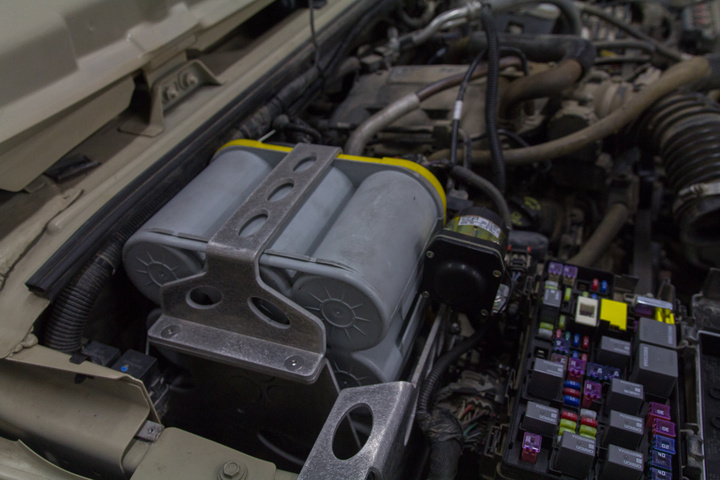
- A dual battery tray. I have the Nemesis Industries tray which is specifically designed for the Optima D34 batteries. The batteries mount on their side, saving previous space.
- A solenoid for isolation. I’m running a kit from specifically designed for this purpose, and it’s excellent. (Note the Painless kit comes with everything you need, and a switch so you can control when the batteries are connected. The following instructions will not use that switch so they’re generic for all solenoids)
- Heavy gauge wire to connect the batteries, works great for this. You’ll need one black wire to connect the two negative terminals together, and two red wires to connect the two batteries to the solenoid.
- for the House Battery. I really like the kind that have a large post for connecting the wires of all the accessories I’m running
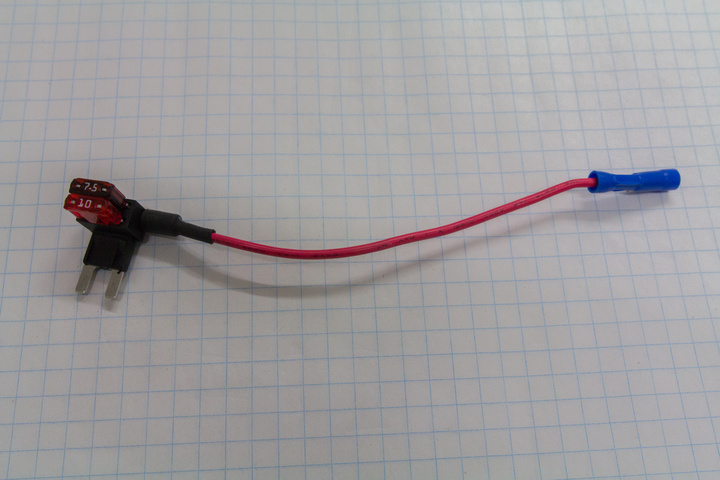
- A – we’ll stick this in the JK fuse block to trigger the solenoid when the engine is running
- Zip ties to keep everything tidy
- Depending on what came with your solenoid, you might need to make a brake to mount it. I used a scrap piece of a right angle bracket I had left over from something else.
Tools Needed
Only basic tools, though the specifics will depend on which dual battery try you use. You really won’t need more than a ratchet and extension bar, a few sockets (at least 1/2 inch and 10mm), some kind of saw to cut plastic (hand or electric is fine).
A deep 10mm socket is handy.
Step 1:
Follow the instructions that came with your dual battery tray to remove your existing battery and the large factory plastic tray, and install the new dual battery tray. Usually this involves cutting the factory plastic tray.
Step 2:
Install the two batteries in the tray – when using the Nemesis Industries tray it’s recommended to install the Hose Battery on the bottom, and the Engine Battery on the top. If your tray mounts the batteries side-by-side or front-and-back, check how well the stock jeep wires for the positive and negative will reach each location. Whichever battery suits those wires the best can be your Engine Battery.
Step 3:
Connect the negative terminal of both batteries directly together. These will always be connected with large gauge wire, and never need to be disconnected.
Step 4:
Find a good spot to mount the solenoid. You’re going to run heavy positive wires to the large terminals from each battery, so keep it close to the batteries. Check hood clearance, and make sure neither terminal will touch any part of the body nor hood.
Step 5:
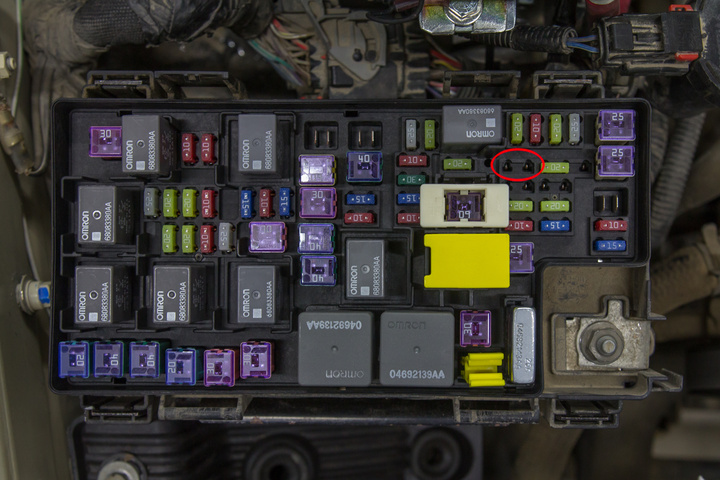
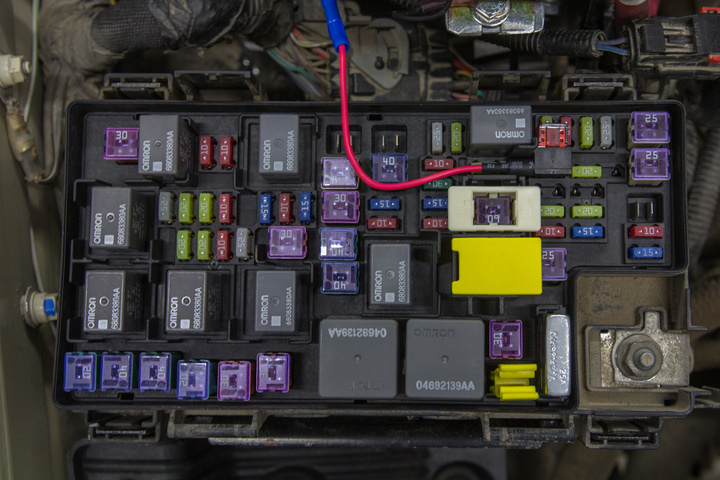
Install the inline fuse/wire in the JK fuse block in the location indicated on the picture below. This will trigger the solenoid to turn on when the engine is running. Drill a hole just big enough for the wire in the bottom/side of the JK fuse block cover, feed the wire through and put silicon around it to seal the hole from dust and water.
Connect the other end to the small trigger terminal on the solenoid.
Step 6:
Connect the other small terminal on the solenoid to an earth – this could be the negative of either battery, or the body of the Jeep. Remember, they’re all connected together now, all the tire, so it doesn’t matter what you use, it’s all the same thing.
Step 7:
Connect one heavy gauge red wire onto the positive of each battery, and to each of the large terminals on the solenoid.
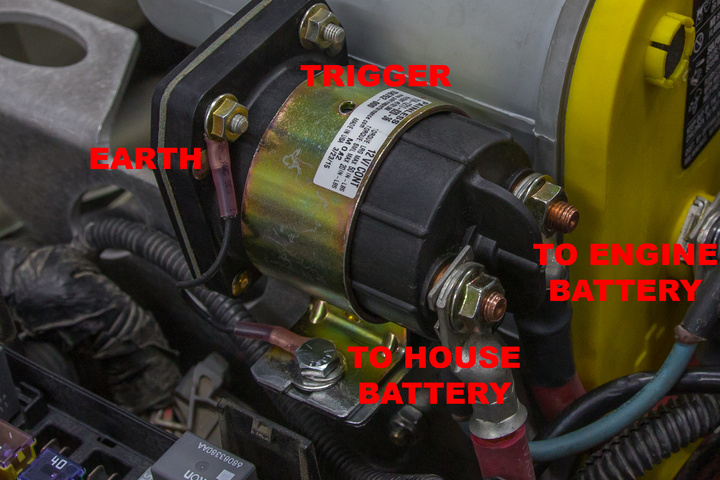
Painless Solenoid with terminals labeled. It does not matter which battery goes on which big terminal.
Step 8:
Connect all your accessories (fridge, lights, etc) to the House Battery positive and negative.
Step 9:
Connect all the stock Jeep wires onto the Engine Battery positive, and then lastly connect the stock Jeep wires to the negative of the Engine Battery. Leaving the negative until last ensures you won’t get a really big spark if you accidentally touch something to the body during the whole setup.
Step 10:
Zip tie like wires together and out of the way, and attempt to make everything as neat as possible, which is not easy.
Step 11:
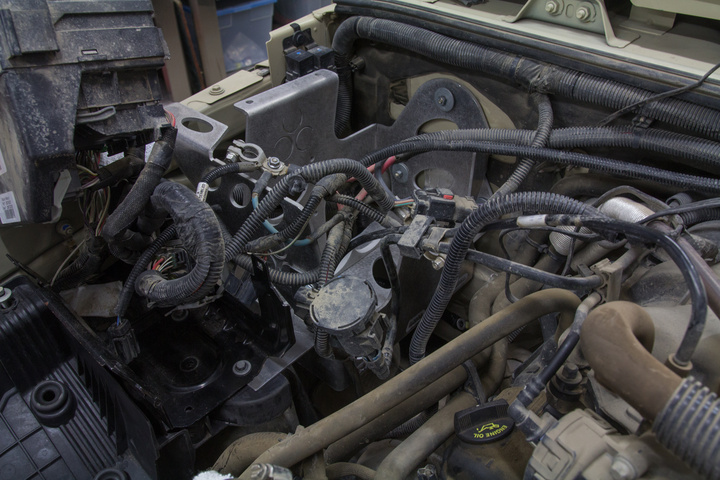
Test out your new isolated dual battery setup – When you start the engine you will hear a “clunk” as the solenoid connects the two batteries. You will hear the same “clunk” when you turn the engine off again.
Enjoy hours of lights and icy cold beverages without worry of draining your Engine Battery!
-Dan



Did you wire the painless with a Contura like switch to your dash at all? I have the same kit but do not want to use their switch but I can’t figure out how the internals on the switch work. Please do let me know
Thanks
I decided not to use the switch at all, I wanted everything to be fully automatic.
Just don’t wire in the switch at all. Put the two big lugs on the solenoid to each positive of the two batteries. Join the two negatives directly together. One of the small lugs goes to ground, the other one goes to a wire that’s hot when the engine is running.
So now the solenoid will automatically connect the batteries together when the engine runs, and it will disconnect them when the engine is turned off, without the need for the switch at all.
I hope that helps,
-Dan
I work in the inverter industry and I can absolutely tell you, they way you described the install …
“Put the two big lugs on the solenoid to each positive of the two batteries. Join the two negatives directly together. One of the small lugs goes to ground, the other one goes to a wire that’s hot when the engine is running.
So now the solenoid will automatically connect the batteries together when the engine runs, and it will disconnect them when the engine is turned off, without the need for the switch at all.”
…is EXACTLY how I suggest my customers install house batteries and isolators.
Hi Jerry,
Thanks for the input, glad to hear it!
I’ve been running the system for over 2 years now, and it works perfectly. I’m really happy with it!
-Dan
You are gonna get stuck. The way you wired it disconnects one battery when the car isn’t running. If you disconnect the car battery, and the other battery runs flat, you can’t get it started, and until it is started, the solenoid can’t kick in to turn on the car batt.
Hi Darryl,
That’s not how I wired it, and I already tested it out by completetly draining the house battery accidentally.
The engine fired right up no worries off the engine battery, then the solenoid kicked in, joined them, and the alternator recharged the house battery.
-Dan
Any stock un-switched current draw will still draw from your starter battery, instead of house battery. So leaving dome lights on will still drain your starter battery instead of your house battery in this configuration. Or switched accessories like the stereo are still on the Starter battery and not the house. Did I miss the part in the setup where you moved these items to the house battery?
Hi Dave,
You are 100% correct, and I did not move those items to the house battery.
On the Jeep those things turn off after the key has been out of the ignition for a few minutes, or as soon as a door is opened. I also don’t have any stock dome lights, I installed my own on switches.
You are absolutely right though, if I did something like have the key in the ignition playing the radio for hours and hours I could drain the starter battery, so I still have to use my head in that scenario.
-Dan
Could you use a manual switch instead of the solenoid?
In theory, yes, but you’ll need something that can handle a couple of hundred amps of current, which is not easy.
The Painless kit I used comes with a three position switch so you can decide how it works.
Position 1: the system functions like mine – auto connect and disconnect.
Position 2: The batteries are always bridged.
Position 3: The batteries are never bridged.
So by wiring it up according to their directions, you’ll have the best of all worlds, and ultimate flexibility and control.
-Dan
Love the instructions and thank you for putting this up. I followed them, but my battery light is now on. Did your battery light come on after this setup?
Hi Ron,
No, it did not…. did you mess with the alternator wiring at all? Is all the original “Jeep” wiring still connected to the main battery + and -?
-Dan
I did not mess with original wiring at all, just followed your setup.
Hey Ron,
Hmm, that’s an interesting case. I’d be interested to hear if you get to the bottom of it!
-Dan
I also got the battery light.
AutoZone said my stock alternator is just barely putting out 12V which isn’t enough. I have a new alternator coming which should fix it hopefully.
Hi Wyatt,
That’s really strange, I hope the new alternator fixes the problem. It should be putting out 13.8v for sure, so maybe that it..?
Please let us know if it does fix the problem!
Cheers,
-Dan
Awesome instructional brother! Thanks
Would that not make the (discharged) house battery overcharging when you start the engine by getting (unregulated) current from the starting battery hence reducing its life?
Maybe it’s fine, I just have no idea how important (or not) it is to control current when recharging a battery. I know you are not supposed to put more than some X% of capacity (1/10? of the capacity) as charging current.
Hi Loic,
That is not something I’ve thought of, and could potentially be a downside of my system. The house battery just gets current directly off the vehicle battery and alternator when the engine is running. Although, I never let it discharge below 11.5v, so it’s never really empty.
-Dan
Great write up. Looking to add this to my jeep to run my fridge. When you say “connect the negatives together”, exactly how did you do that? Just wrap wire through the eyelets or some other means?
Hi Wes,
I have a large 0 gauge wire bolted to each negative terminal, so they are directly connected.
-Dan
Any advice when nothing happens? Followed instructions and no power…
Hi Wesley,
When you say no power, do you mean no power to the Jeep, or no power from the aux battery?
You’ll have to start tracing with a volt meter to see whats going on.
-Dan
Dan, I will be wiring my jeep for a dual battery soon. Do you know if it would be a good idea to run all accessories from the house battery, and only have the engine battery used for starting? What I am getting at, is I was thinking of taking the factory wiring harness and attaching that to the house battery, and just have the starter connected to the engine battery. I have the same fridge you mentioned, and I use the factory 12V outlet in the back of my JK. I want the power to this to come from the house battery. I was thinking the easiest way to do this would be for all my factory accessories to come off the house battery.
Hi Steve,
I *think* that will work, but to be honest I don’t fully know the consequences.
I think the better option is to run new bigger gauge wiring from the house battery all the way to the fridge so it’s big enough for the current draw, and you know exactly how it’s wired.
-Dan
Great post, one of the best I have seen. I am doing this on a different vehicle, I’m wondering if it matters where I place the fuse tap to have the same effect you did? If it does how do I decide where to put the fuse tap in my fuse box?
Hi Landen,
Use a miltimeter to find a fuse circuit that is not active when the engine is off, and becomes active when the engine is running – that’s the one you want to use!
-Dan
Hi Dan,
Installed this last night after having all the material sitting on shelves for months, doing one upgrade at a time.
Excited and glad to say the car starts after all.
However, I have difficulty hearing the ‘clunk’ you mention.
Will double check in the near futur.
Thanks for the share!
Tom