Overland vehicles require a way to carry drinking water, preferably a minimum of 10 gallons, or more. Ideally, for International Overland Travel, they will also have a reliable way to filter and treat water to ensure purity and removal of bacteria when only water of questionable quality is available for refilling.
I designed and built a custom drinking water tank, pump, filtration and treatment system that I’ve mounted underneath my Jeep Wrangler Unlimited. I’m going to keep this DIY article generic enough so it can be applied to any 4×4 vehicle, not just the Wrangler. This is a very involved project, and shouldn’t be taken lightly. At each step I’ll present the various options I considered, along with what I see as the pros and cons to each so you can design your own system to meet your needs. This article is mostly focused on how you will design your own system, rather than how to actually build it. Once you’ve made all the hard design decisions and bought everything you need, everything else is mostly just connecting it all up however you can make it all fit in tight spaces!
No matter what options you choose, this project will require hundreds of dollars, and likely many days of work by the time it’s all said and done. It might also require significant modifications to your vehicle, possibly permanently.
That being said, it’s also one of the best modifications I’ve ever made. Heading off the beaten path and knowing I have a huge supply of safe drinking water at the turn of a tap is a wonderful thing.

Water tank mounted with straps and plumbed in, ready for test
Design Considerations
1. Where to mount the tank:
The biggest decision is where to mount the tank itself, either inside in the cabin somewhere, or underneath the frame rails somewhere.
Inside Pros:
- No drilling holes in anything to run hoses
- No need to make a rock guard/skid plate
- (Maybe) No need to worry about anything freezing, depending on how cold you plan to get and if you’ll have the heater running
- You could also make the entire install removable without too much effort, so you could have it in for some weekend trips, and take it out for the weekdays.
Inside Cons:
- The tank will take up precious interior cargo volume, depending on your vehicle this could be a big problem
- The weight of the water will be higher which is bad in off road situations. If you do a lot of hard trails, think carefully on this point.
- Draining the tank could be difficult and/or messy
Underneath Pros:
- The weight of the water is absolutely as low as possible.
- The tank doesn’t take up any interior volume, which might also mean it can be bigger overall.
Underneath Cons:
- You need a space be enough for it to fit.
- Depending on where you put it, the weight could be very far back (i.e. behind the rear axle)
- You will have to make a rock guard/skid plate, and even then the tank is vulnerable to damage.
- You might have to worry about it freezing.
I am very limited on interior cargo space on my build, so from the very beginning I wanted to mount the tank underneath. I wanted as much water storage as I could physically fit in the space available, because that will likely be the limiting factor of how many days I can go without being back in a town for the trip I have planned.
On the Wrangler JK Unlimited I relocated the Evaporative Canister further back (using a kit), opening up a large space between the exhaust and the driveshaft on the drivers side.
I like this location as the weight is very low, and is almost centred between the two axles.
It would have also been possible to relocate the muffler into that space, and mount the water tank where the muffler normally sits behind the rear axle. A tank of similar size would fit there, though I didn’t choose this route because I didn’t want the weight that far back, and modifying the exhaust was more expensive than moving the Evap Canister.

Relocated Evaporative canister t the rear of the Wrangler Unlimited, above rear axle

Water tank location test fit under the Wrangler Unlimited, looking front to back
2. Custom made tank or generic?
It all comes down to price. Custom made tanks can be made to any size, meaning you’ll get the maximum possible amount of water storage for the space you have available. Be warned, custom tanks are around the $500 mark, where-as generic RV or Boat drinking water tanks can be had for $50-$150.
Either way, be certain your tank is drinking water safe!

My water tank ready to install with adapters and depth gauge mounted on top
3. Plastic or Stainless Steel Tank?
Plastic is lighter, stainless is more durable. If you go with stainless make sure you read up on what is appropriate to clean the tank with to ensure nothing bad builds up in the tank.
I personally chose plastic because it’s lighter and I found the size I needed.
4. Do you require filtration and/or treatment?:
For a vehicle staying in North America, I’m not sure I could justify the extra expense and complexity of a filtration system. 99.9% of all tap water is perfectly drinkable, as-is water from lots of mountain streams. When in doubt I’d add a teaspoon of chlorine to each fill up and call it good.
Given I’m going to Africa for 2 years, I wanted to have extremely high quality filtration to add an extra safety margin when filling up from water that is supposed to be “good”, with no guarantees.
You can never be too careful.
After experiencing water in Central and South America for two years on the road, I would personally run very good filtration and treatment for that trip too.

Completed plubming and wiring inside behind drivers seat. Pump, ball valves, wiring and filter and UV treatment on right
5. Do you require a pump?
Given the pump is cheap, and the convenience of having running water, I’m going to go ahead and say you do want a pump. Trust me, you won’t regret it. Getting water out of the tank with a hand or foot pump is certainly possible, though I never looked into it personally.
6. How do you want to fill the tank?:
There are a few different options here, that likely depend on where your tank is mounted, if you’re running filtration, and if you want to cut big holes in your vehicle.
Gravity Feed
You could just have a large diameter hose with a fill spout you physically pour water into, like older RVs. It would be your choice if the spout was inside the vehicle, or mounted to the outside with a locking cap like those older RVs. Mounting it outside might require some big holes to be cut, and I’d personally want a locking cap on it if I went that route.
Suction using the pump
If you’re running filtration, it’s likely you want to filter the water before it goes into the tank. I designed my system so that water is sucked in a suction hose, through the pump, through the filter and UV treatment, then into the tank.
On the way out of the tank it goes from the tank, through the pump, through the filter and UV treatment and finally out a faucet for use. This system is working well so far.
7. How do you want to use water coming out of the tank?:
I personally have a regular faucet mounted in my Jeep, and I’ve also seen Overlanders that have a spray nozzle on the end of a flexible hose so they can spray thing outside their vehicle. Both have their uses, and I might wind up running both so I can choose which to use for what purpose.

Running water inside the Jeep! I mounted mine at the back corner of the hardtop
8. Do you want a depth gauge?:
There isn’t much point having a tank if you don’t know how much water is in there. If the tank is inside and clear enough, you might be able to see it to estimate how full it is. If the tank is underneath, it’s going to be very hard to know how much water you have without a gauge of some kind.

Depth Gauge turned on
Hopefully you are starting to get a picture in your head of what you want your water system to include, and how it will function. Read on to see how I made mine, which will likely further help clarify your design.

Diagram of how I plumbed my system to fill with suction, and double filter the water
Things To Buy
- The water tank. Get your maximum measurements ready and start looking! I spent at least 50 hours on Amazon, eBay and RV and Boat water tank websites, scouring to find a tank with appropriate dimensions. If you’re mounting inside, it’s very hard to beat the Front Runner tanks, which are designed specifically for this purpose. Remember to look at RV and boat catalogues / websites. Scour the size options at the following sites: Amazon RV Water Tanks, GreatLakesSkipper, Ronco-Plastics, eBay, West Marine, Plastic-Mart
- A 12v pump. I went with a Shurflow 3.0 Revolution. These Shurflow pumps are the standard in RVs, so they’re super reliable. It pumps 3 gallons per minute, has a built in 55psi pressure switch and draws 7.5 Amps at full load. It’s also a lot cheaper than other options. It’s very quiet too. Standing at the back of the Jeep, I often am not certain it’s running, other than the water coming out.
- A filter and water treatment system. I went with an all-in-one Pura UV 0.5 micron filter that has a built in UV lamp that runs on 12V. It’s expensive, but I’m sure it will be worth it.
- A strainer for the pump – you need one for warranty and it’s good insurance against damaging the pump if you happen to suck up something large. Get a couple of ShurFlow elbows too – they really help when putting the pump in a tight space.
- A depth gauge. After tons of research I went with an electric system from Votronic. It consists of a sending unit in the tank, and a gauge. By sensing the conductivity on the electrodes, it very accurately measures water depth, and therefore tank fill level. The gauge updates in real time so it’s great to watch while pumping water into the tank.
- Hose to join everything up. I went with Braid Reinforced 1/2 inch so it would be very durable
- Hose clamps. Buy three packs, you’ll use them.
- A faucet, or something to get the water out. I went with this Skadvik one because it’s high quality but not too expensive.
- Brass elbows. Again, but a couple of packs, you’ll use them.
- Brass Tee junctions. My design uses 2 to divert the water from “fill” mode to “use” mode.
- Ball valves. My design uses four to be able to switch between pumping water into the tank, or pumping water out of the tank.
- Rubber grommets. Anytime a hose is going through a hole, or might rub on something, use a grommet.
- Depending on your tank, you’ll likely need plugs and adapters for the various threaded holes that will be on the tank. Amazon has tons of options, mix and match to your needs. Everything needs to eventually be at 1/2” to fit the hose.
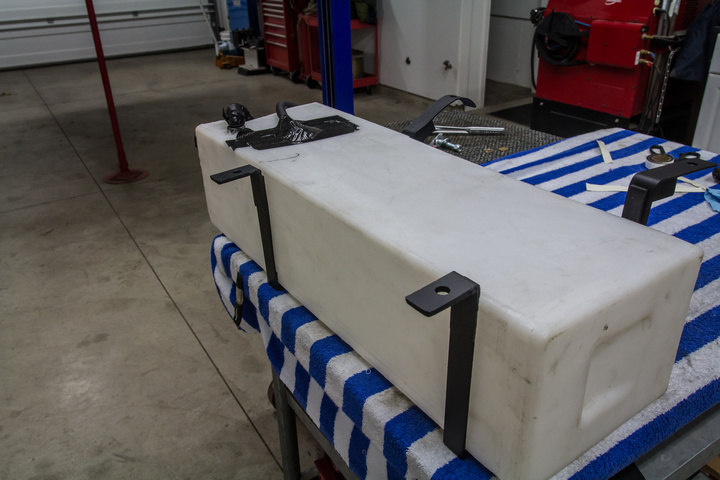
- Hangers for the tank. I’ll leave this up to you based on what you’re making and where you’re mounting it. I bought straight steel straps then cut, bent and drilled them as required.
- Steel for a rock guard/skid plate. Depending on how strong you want it, pick your thickness and attachment method. The size of your tank and how it ties into whatever else is under your vehicle will determine the size of steel sheet you need. Remember, the thicker it is, the heavier it will be, and the harder it is to work with for bending, drilling and welding. Mine is actually quite thin, and more like a rock guard than a skid plate.
Jeep Note:
For the Jeep JK Unlimited with 3.8 gas engine and stock exhaust I used a tank that is 30.5” long, 6” high and 10” wide. That is absolutely the widest that will possibly fit between the exhaust and driveshaft (even 1/2” more would be too much – it’s extremely close to the exhaust), and it hangs exactly as low as the stock gas tank skid. It could in theory be quite a few inches longer for extra volume, but I couldn’t find a generic tank in that size. If I had a custom tank made, I would have made it longer, but not wider or taller. Double check the measurements for the 2012+ 3.6 gas engine, I think the stock exhaust is different in that area, possibly limiting space.
The exact tank I used is no longer in production, unfortunately.
Tools Needed
Mounting the tank inside only requires basic tools like screwdrivers, sockets, and some wiring stuff to get power to the pump. You might need a drill to mount the tank, pump and filter, depending on where you’re mounting it.
Mounting the tank underneath is much more complex and requires the ability to cut and weld steel, drill holes in your vehicle, etc.
Step 1: Prepare the Tank
Install plugs and adapters on all the threaded holes in your tank. I have a “water out” on the bottom-side edge, “water in” on the top-front edge, and a “breather” on the very top surface. I wanted a breather to make sure I don’t pressurize the tank when filling, or cause suction in the tank when taking water out. The breather is also used as “overflow” when I’m filling the tank. My tank had one other large threaded hole at the back that I put a plug into. It can be used to drain the tank for cleaning if that is required.
My water tank ready to install with adapters and depth gauge mounted on top
Step 2: Install and Calibrate The Depth Gauge
Install the depth gauge sending probe into the top of the tank. It’s recommended to go near the middle so it gets an accurate reading on the water depth. Cut the two probes to the correct length, then calibrate the readout with the adjustment on top of the probe. I found it easiest to fill the tank, then adjust the dial until the readout said 100%. I watched the gauge go down as I emptied the tank to make sure it was accurate when near empty too.
Step 3: Mount the pump, filter, etc.
Find a location where everything fits and mount it all. I drilled straight through the floor and bolted everything down to that, right behind the drivers seat. Make sure all your hoses can route where you need them too (inc. all the ones to/from the tank) and that your wiring will reach. Drill holes to route the hoses that will go to/from the tank.

Progress on the inside setup with pump and hoses. Filter on right. Behind/under driver’s seat
Step 4: Mount the Tank
If you’re putting it inside this should be relatively easy, and hopefully you can pickup existing bolts/threaded holes in your vehicle.
When mounting underneath you’ll have to consider how you want to hang the tank, where the hoses will route up into the cabin, how to protect the tank, and if you need heat shielding on the tank. Put foam weather sealing on the straps and anything else that will directly contact the tank to give it a little cushioning.

Hangers made for the tank from straight steel straps
Step 5:
Connect all the hoses and the wiring and test out the system. Now is the best time to check for leaks, so fill the tank and test it out. Double check all your connections for leaks, and check the depth gauge works as expected.
For wiring, I have a 12v switch near the pump I use when filling the tank, and another switch near the tap I use to turn on the system when I want water out of the tap. The switches are wired in parallel, so either one can be used to turn on the system at anytime.

Water tank mounted, and tested, half full, from rear
Step 6:
Make the rock guard / skid plate. Now you know it doesn’t leak you can make the rock guard and cover it up. I put Dynamat on my tank to protect it from the heat of the exhaust which is close.

Dynamat on the mounted tank to protect it from the heat of the exhaust and road

Progress on the rock guard, from the front

The completed tank and rock guard
That’s it! enjoy your new drinking water tank!
-Dan


Dan,
Great write-up and nice system. I bet having running water on board made a big difference in camp.
I did notice something for your review, the Pura filtration unit you linked to in your write-up is a 1 gpm unit, and you stated your pump is 3 gpm. If the pump can pump more than the UV filter is rated for, you won’t get the kill from the UV.
Thanks Jared,
Yep, running water is absolutely awesome.
My understanding is the filter just slows down the water to 1gpm.. i.e it doesn’t matter how much pressure you put behind it, the water just doesn’t go through any faster. Based on how quickly I can fill a 1 gallon container, I’m absolutely not getting anywhere near 3gpm through the system.
I have not measured it but 1gpm (or even less) seems right.
-Dan
Good to know Dan. So as long as you don’t exceed the max pressure of the filter unit, you don’t need to balance the pump and filter. That makes sense.
Right, and to be honest I don’t know what the max pressure of the filter unit is, but it seems to be just fine going all the way up to when the pump cuts out at whatever it’s stock pressure rating is.
I even accidentally froze the entire system solid a few nights and everything seems A-OK (lucky!)
-Dan
Nice presentation. simple and meaningful.
its really wonderful article
Dan,
Nice write up. Thanks for taking the time. Too bad about the tanks not being made any longer. I never thought about the filter part but I am not planning on traveling to areas with bad water. One thing I was planning on was a Hot Water system for showering and washing things. I was thinking of a Glind heat exchanger. Definitely saving your write up…..sounds like my Jeep will be down for a little while for this Mod as slow as I am, so may it should be a winter project.
Thank,
Andy
Hey Andy,
You are very welcome.
A hot water system would be awesome. I’m in such hot climates I figured a solar shower would be enough for my needs.
All the best,
-Dan
I’m sure you know this, but for those who don’t, the JK Wrangler’s rear bumper makes a perfectly good water tank all on its own. It’s water tight and holds about eight gallons. Just seal two little quarter inch drain holes and put in a fill/drain system.
I went the cheap route, just put a female garden hose fitting in the top and a male one on the bottom, caps for both. Gravity fill, gravity drain. You could fit all the things you did to your tank to it if you wanted to.
I don’t expect to need it for drinking water, but it certainly works for washing water. And of course I could use it for drinking water if I treated it.
Or fuel if there were some emergency.
Thank you, I just found this blog and I’m devouring it! Was in South Africa a couple of weeks ago, very few jeeps to my surprise.
Thanks for the comment.
The stock rear-bumper water tank is a great trick, and something I thought about for washing up / shower water. In the end I have the AEV rear bumper that holds a few gallons for that kind of thing.
Interesting you didn’t see many Jeeps in South Africa – it has official dealers and I’m told they are rapidly growing in popularity.
-Dan
i saw ur video on youtube and inspiring me i hope one day i have the gut to do the same like you do. thank you for all the write-up and video
So how long before your tank failed due to heat from the exhaust pipe?
Hi there,
The tank is working perfectly, the water doesn’t really get any warmer than the ambient air / the surface of the road (which is hot!)
I’ll post a walk -around video of the whole system sooner or later, it’s one of the most-used features of the whole Jeep!
-Dan
Great job on the project and article… very helpful. Sourcing the perfect sized tank for my Tacoma was done in less than an hour thanks to your sharing! Cheers.
Awesome,
I’m happy to here that! Can you share which tank and where you got it from so other people can follow in your footsteps?
Thanks!
-Dan
I went with a 23 gallon RV tank from PlasticMart that is 8″ x18″ x 40″ that comes with threaded fitting holes. Still trying to figure out a breather fitting. Here’s a link: http://www.plastic-mart.com/product/527/23-gallon-rv-water-tank-rvb378
Dan,
What a great article and simple instructions to follow. I am using yours as is with no changes on my build. I found a link on expedition portal back in 2015 when you were trying to work out your water plan. Thanks for posting everything in such a simple step by step article. You saved me from having to search to the end of the internet.
Hi Heath,
Great to hear it was useful for you!
Let me know if you have any questions and I’d love to hear how it turns out! Good luck, I use my many times every single day!
-Dan
For those that are looking for alt tank for the JKU, I’ve had great success with this one from Ronco Plastics: RV23W 11 gallon tank. https://ronco-plastics.com/newRonco/product_details.php?prodID=628. It hangs about 3″ lower than Dan’s above, but high enough not to cause any issues.
Thanks Wesley that’s great!
Do you have photos of your install/setup somewhere?, I’d love to see it!
-Dan
Thanks Dan, you’re post was a huge help for our system.
We just finished our blog post / write up for our water tank system. https://www.youmeandthejeep.com/posts/adding-onboard-water-to-your-overland-rig
We’re working on a walkthrough video and will update that post when its complete.
Hi Wesley,
That is simply awesome! I love that you made the design your own, and the heat exchanger is a GREAT idea.
I have been thinking about how I would add hot water to a future design of mine, now you have me thinking!
Awesome work, and thanks for documenting it so thoroughly!
-Dan
Is your water tank still mounted under the Jeep? Any issues with the install you’ve done?
Hi Wesley,
Yep, the water tank is exactly as I built it almost 2 years ago and has been flawless. It’s probably the most-used modification on my Jeep and it’s been brilliant.
-Dan
Hello Dan, Great build! Can you fill your system using a hose with standard house water pressures or will it ruin the pump? Thanks, Keith
Hey Keith,
There is no reason I can’t do that, but I usually just run the hose into a bucket then let the pump pull that water in. I set it up this way so the water is filtered on the way in and out, but it would be easy to design it differently.
-Dan
Why 4 ball valves? I just count two?
Hi Anton,
The diagram is not quite accurate, because I couldn’t find a “three way” ball value.
So coming in from the water feed it goes into a T, then there is a ball value on each side of the T.
Same goes for where it comes out of the tank.
So all in all there are 4 ball valves because they are after the T each time.
I hope that makes sense
-Dan
Hey Dan,
Invaluable article. Did you consider a lifesaver jerry can? How about mounting a tank same as you did but instead of plumbing a pump and filter and everything else, just gravity drain into the jerry for use of filtered water?
Cheers
Hi Kieran,
Certainly that setup would be possible, and might work really well for weekenders or week-long trips. Remember, this has been my house for 2.5 years now, and I use the system at least 4 times a day, every single day. I don’t want to mess with Jerry cans or wait for gravity!
Also, if you use gravity, you’re putting the water in unfiltered and untreated, so eventually you will get nasties growing in your tank!
-Dan
Very true, good points. Definitely a more long term setup you’ve got going on.
Hi Dan,
Thank you for publishing everything from soup to nuts on over landing. I think you have made it accessible for many people. My question is regarding your Pura UV system how well did that work? It seems like the UV bulbs can be fragile, did you ever have any problems with it considering all of the very smooth African roads.
Hi Andy,
You are very welcome, I really enjoy helping others get the info they need!
The UV lamp held up really well. It never broke, and I’m still using it every day without issue. Pura UV recommend replacing it after some amount of time, and I just wiped it down each time I put in a new filter. I suppose I should replace it soon to ensure it’s still working efficiently, but it certainly has never broken.
Cheers,
-Dan
Thanks Dan. Today I announced my retirement and my wife and I are heading off on our multi-year round the world trip in May. We are shamelessly copying your water filtration set up and was wondering what you had at the end of the intake hose? Normally it’s a heavy device to keep the end down in the water away from the air. Thanks again for everything!
Hi Andy,
That’s great to hear! Congratulations!!
I actually don’t have anything at the end of the intake hose, I just stuff it into my bucket and kind of wedge it there so it doesn’t come up to the surface. It works fine that way. I did cut a “V” at the end so it can’t suction to the wall of the bucket though, which was helpful.
All the best, don’t hesitate to ask if you need anything else!
-Dan
Hey Dan,
How has this lasted in the cold temps? I currently live in Colorado and would love to build this set up, I’m just worried it will freeze over too much throughout the winter.
Thank you
Hi Mike,
It has been freezing in the last few days and weeks – I saw -17F overnight a week ago.
It’s by no means ideal. I’m sure the tank won’t freeze unless it gets really, really cold (so much water in there), but all of the plastic fittings in and out of both the filter and the water pump are a real concern. I’m worried the plastic will crack, and then the only option would be to replace it.
So my plan for the winter is to drain the entire system and just not use it until the temperatures warm up in the spring!
Good luck designing your system,
-Dan
Hey Dan!
Thanks for the write up and sharing your experiences!
Have you had any issues with your driveshaft contacting your skid plate when the suspension flexes? I realize you don’t ‘rock crawl’ but I know you’ve travelled some unmaintained ‘roads’ that had to have flexed the suspension out a bit, and from the pics it looks like the spacing between the driveshaft and the skid plate is pretty tight.
Thanks again!
Hi Steve,
No, they don’t contact each other even at full flex. I have the 6 speed transmission though, I’m not sure if that makes any difference.
-Dan
Wondering if the Votronic tank probe is working well with the vibration. I’m afraid of using this for my offroad rig as I feel that the 2 probes might touch eachother or bend with the vibration and liquids sloshing around.
Hi Charles,
I think that’s exactly what happened to mine, and it doesn’t work accurately anymore after years and years. I’m not sure whats going on exactly, I have not bothered with it lately.
-Dan
Hi Dan
We are about to undertake our own African Adventure. We’ve been looking at various water filtration systems but keep coming back to yours and have decided to go with that!
Can you tell me how many replacement cartridges you used in your three years, and if you also drew water from rivers and lakes, or did you stick to village wells?
Thanks
Aly
Hi Aly,
I replaced the filter when I got to Namibia.. and it was clogged by that point, I probably should have changed it sooner.
I replaced it again after 6-8 months around Southern Africa, and then again towards the end of the trip. So I’d say 4-5 filters was good for me.
I only ever filled up from wells or taps, and only once or twice was the water not clear to look at.
Every time the used filter was a nasty shade of brown compared to the new one that went in, so it was obviously doing it’s job!
-Dan
Thanks Dan!
Thank you for the info! I’ve been looking at different ways to set up my water supply and couldn’t decide on how I wanted to go about it until reading your forum. Ordered my tank from Front Runner today! Good luck on your adventures!
So much great information! The only issue I have with your article was this: “as-is water from lots of mountain streams.” Er…. I live in Colorado and we teach our Boy Scouts here to always filter water.. Giardia and other fun things infest water and you can get sick from high elevation streams. Plenty of creatures live above 12,000 feet and you never know if you’re drinking corpse/defecation water.
You opened a big can of worms. I didn’t realize water was such a problem for campers. I can see the need for filtered water from a ground water source but the remarks below make it a major issue. If it’s clear, and free of debris I think boiling is the best way to handle lake or river water. Don’t think I would use anything else other than a simple emergency water filter devise for small needs. In most cases a few drops of chlorine in a 5 gallon tank will kill all the germs and E.coli. I’m going to pay attention to everything said here.
Thanks Dan, you videos and articles are inspiring and honest. I am currently building out my xterra with a pull out kitchen and water system. I decided to copy your system with a few tweaks to allow pressurized or pump suction fill. My pura filter arrived today. My question is when mounting the filter do you recommend a solid hard mounting or should there be some sort rubber bushing or spring mounting to deal with the vibrations of off road travel? Thank you again for your overland wisdom and your focus on the reality of vehicle based exploration.
Hi Russ,
You are very welcome! I hard mounted my filter to my cabinets and it’s never been a problem, though in hindsight a few rubber bushes wouldn’t hurt I’m sure!
Good luck with the system, mine has served me very well!
-Dan
Thank you for sharing. We were teaching our jane’s and Joe’s over landing before over landing was cool. Your “use chlorine or iodine if you’re not sure” is totally solid. Survival Squared.. If your current gig does not work out or you want adventure, find a US Armed Forces recruiter. They will be happy to see you.
Hi Dan,
I like your design and I’m thinking about something similar for my vehicle, but I doubt about the double filtration system. How come you filter all the water twice? It has already been filtered when it gets into the tank. Why don’t you just bypass the filter from the pump right into the tap and out? Your filter would have a longer life and that means less replacements and less weight while overlanding where filters will probably not be available.
Thanks!
I figured filtering it twice would result in cleaner and safer water, which given I was aiming to get as remote as possible in Africa was the goal from the very beginning. It didn’t add weight or complexity, so it made sense to do it that way.
I’m very happy with the choice, and I did the same thing for my Australian vehicle build more recently.
-Dan
Great setting !
Thank you Dan
Any feedback about the best water tank size for a 2020 jLU ?
The information is really useful. Thanks for it and keep sharing.
I for the life of me cannot find this tank. Every few months, I do a search and start over. It would be great if you would share where you found yours and give us a link.
Hi Don,
I got mine from https://www.greatlakesskipper.com/ , but it was a closeout sale at the time, and I assume they never made any more.
There are also plenty of companies that will custom make one for you if you want to go that route.
Good luck!
-Dan
I agree that in North America, the need for an advanced filtration system in a vehicle might seem a bit over the top given the general quality of tap water. However, your point about adding a simple chlorine treatment as a precaution is a great tip for those who might be traveling to more remote areas or where water quality could be questionable. Thanks for sharing your insights.